· Updated · Dynamics NAV/365 BC · 8 min read
Migrating existing Update Service Server instance to a new server
Hi,
Thanks for every partner attending ConneXion 2025 EMEA in Lisbon, last week.
During the conference, I was asked twice by partners about migrating an existing Update Service Server instance to a new server.
At the time, I didn’t have an answer, but it was definitely something to follow up on and provide guidance to our partners.
This week, I took a few minutes to test this scenario, and below I’m sharing an overview of the steps required to complete the process.
I’m intentionally skipping some details—such as how to back up and restore the database, or how to install IIS on the destination server if it’s not already installed—assuming that our partners are familiar with these steps. However, feel free to reach out if that’s not the case.
And automating the process wasn’t my focus here, but it’s possible to streamline the steps using PowerShell scripts to reduce manual effort and speed things up.
Note that this migration is not supported out of the box. It’s not a one-click operation, but the process is fairly straightforward. There are just a few minor issues to watch out for, which I’ve highlighted in this article to help you avoid spending extra time troubleshooting them.
Depending on your infrastructure, some adjustments might be necessary. But for the most common scenarios, these steps should work just fine.
Overview
Here’s an overview of the required steps, to be easier to follow:
Migration Steps - In the Update Service Server
- Backup the UpdateService database from the source SQL Server instance and restore in the destination server.
- Copy the IIS folder for Update Service Server, from the source server, to the same path in the destination server.
- It is located here: C:\inetpub\wwwroot\Update Service Server
- This folder contains the Update Service Server management console site and all the files storage that contains all the existing packages/bundles that have been downloaded from LS Retail’s public Update Service Server, or created and uploaded by the partner;
- In IIS:
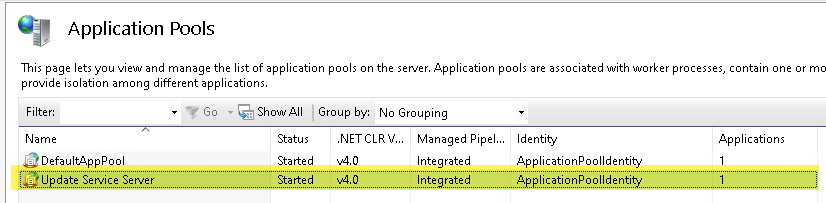
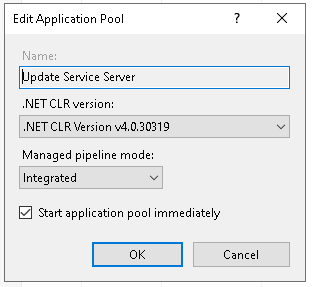
- Create a new Application Pool specific to Update Service Server
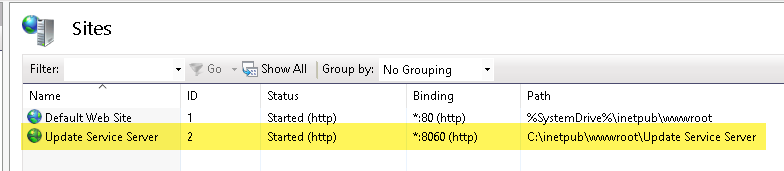
- Create a new Website specific to Update Service Server
- Port 8060 (http)
- Folder: C:\inetpub\wwwroot\Update Service Server
- Install missing IIS modules
- Fix Data folder permissions, in C:\inetpub\wwwroot\Update Service Server
- Updating settings in the new Update Service Server management console
- Install Update Service Server Cmdlet powershell module
- Migrate the project scaffolding folder from the source to the destination server
- Allow inbound firewall connections to Update Service management console port (8060)
- This was required to connect from the POS to Update Service Server VM, because I was running it in a VM in Azure, so it really depends on your infrastructure and policies.
Migration Steps - In the POSes
- Update the Update Service Client setup in the POSes to connect to the new Update Service Server
Migration Steps - In the Update Service Server
Server Requirements
- IIS WebServer component -> Will install IIS Management Console
- SQL Server - Same edition used in the source server, for better compatibility, and same or higher version to be able to restore the database backup
Migrating Update Service database
Backup the UpdateService database from the source server and restore in the destination server.
Migrating Update Service IIS Website
The folder for the Update Service IIS Website is located here: C:\inetpub\wwwroot\Update Service Server
The Data folder contains all the packages/cache downloaded from our public Update Service Server, as well as local packages imported by the partner/customer.
I’ve zipped this folder and copied the zip file from one server to the other.
I had both virtual machines (VM’s) running in Azure, connected to the same internal network, so I was able to share a folder, temporarily disable the firewall in the VM, and copy the file from one VM to the other.
As mentioned before, the Data folder contains all the existing packages in the Update Service Server so this folder can be quite big (my zip file had around 4.5 Gb).
Open IIS Manager in the destination server.
Create a new Application Pool specific to Update Service Server.
Installing missing IIS modules
If a IIS module is missing, you will get an error when trying to open the website in the browser.
There was an error while performing this operation.

Details:
Filename: \\?\C:\inetpub\wwwroot\Update Service Server\web.config
Error:

---------------------------
OK
---------------------------
Same goes if you try to open any of the features in IIS for the new Website. I don’t have a screenshot but you get an error when opening any of these modules in IIS for the new website:
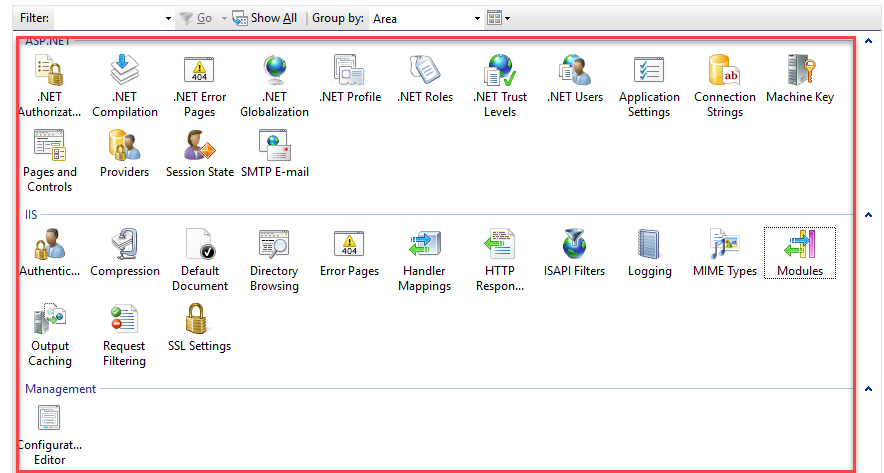
To list the modules being used, run the following in Admin elevated command line prompt: %windir%\system32\inetsrv\appcmd list modules
Running this command on both servers and comparing the output will enable you to understand what modules are missing.
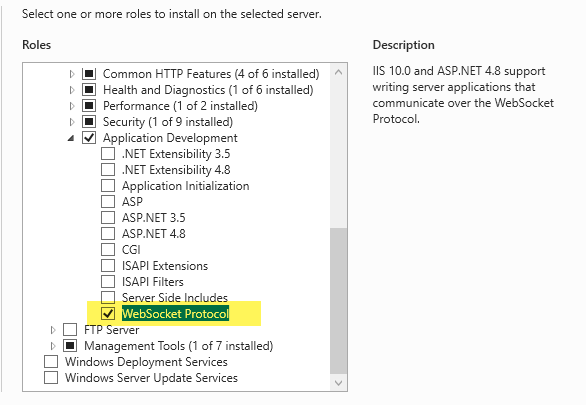
During my tests, 3 modules were missing: Rewrite-Module, AspNetCoreModuleV2 and WebSocketModule.
Rewrite Module
Install Rewrite Module if not available (see Error 1 under Troubleshooting section)
AspNetCoreModuleV2
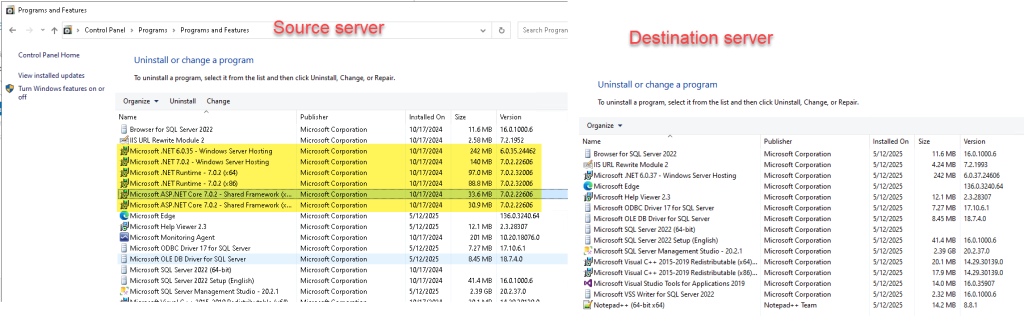
Check the correct version to be installed. Downloaded and installed from here: Download .NET 7.0 (Linux, macOS, and Windows) | .NET
https://dotnet.microsoft.com/en-us/download/dotnet/thank-you/runtime-aspnetcore-7.0.20-windows-hosting-bundle-installer
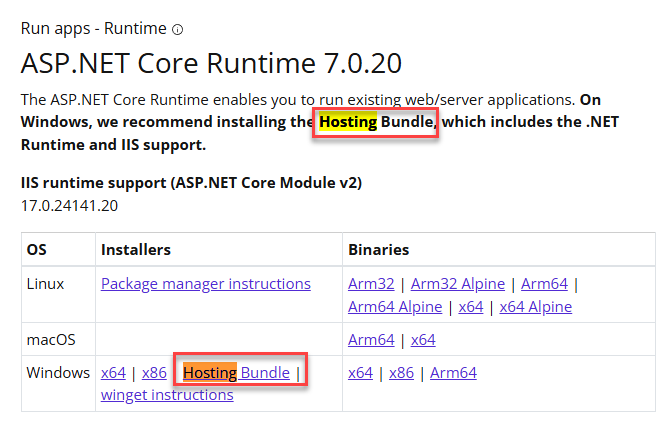
WebSocket module
For the WebSocket module, install it from the Server Manager:
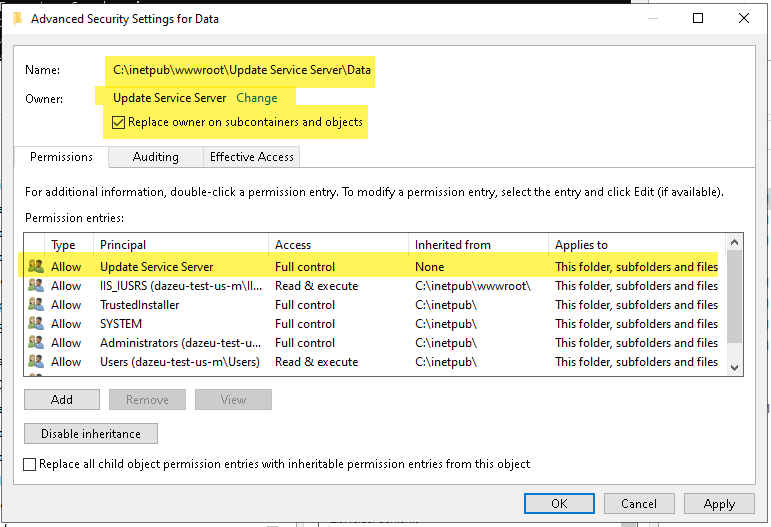
Data folder permissions
The following folder needs to have the permissions fixed, to allow the IIS App Pool to access the files in the folder:
C:\inetpub\wwwroot\Update Service Server\Data
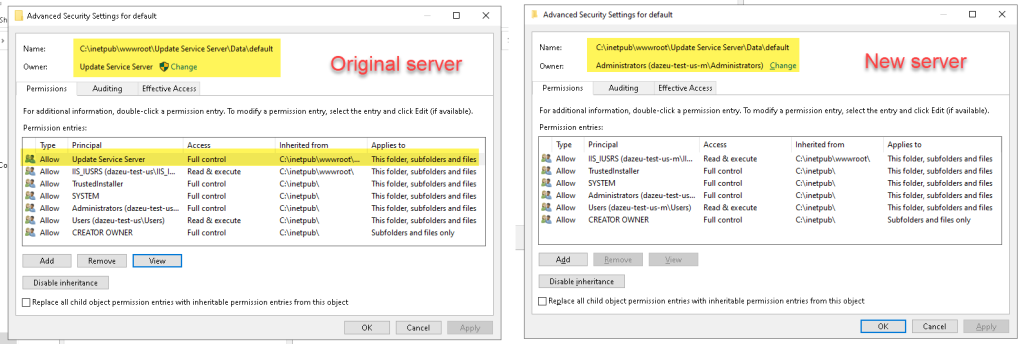
Add the Update Service Server service principal that comes from the IIS Application Pool, by using **IIS APPPOOL\Update Service Server**
Updating settings in the new Update Service Server management console
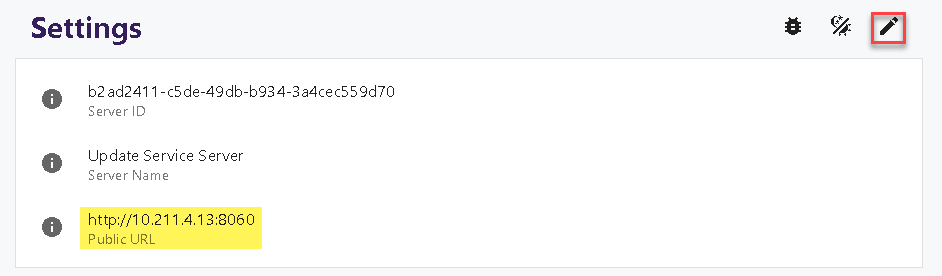
Update the Public URL for the Update Service Server, if that have changed. In my server, the public URL used matches the internal IP address for the server so I need to update it.
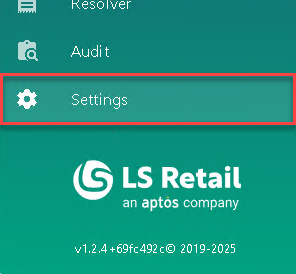
Open the Management Console, go to Settings and update the Public URL.
Installing Update Service Server Cmdlet
Installing missing Update Server Server packages needed to run US related scripts
If not installed, when running the scripts to create new packages and so on you will get the following error:
PS C:\LS Retail\Offline POS> .\NewLicensePackage.ps1
Import-Module : The specified module 'LsPackageTools\LicensePackageCreator' was not loaded because no valid module
file was found in any module directory.
At C:\LS Retail\Offline POS\NewLicensePackage.ps1:31 char:1
+ Import-Module LsPackageTools\LicensePackageCreator
Run the following commands in Powershell to install:
- The Update Service Server Cmdlets
Install-UscPackage -Id 'ls-update-service-server-cmdlets'- This will create folder C:\Program Files\LS Retail\Update Service\ServerCmdlets
- The LS Package Tools
Install-UscPackage -Id 'ls-package-tools'- Will create folders C:\ProgramData\LS Retail\Modules\LSPackageTools and C:\ProgramData\LS Retail\Modules\LSSetupHelper
Reopen the Powershell console once installed.
Copying files/folders related to the Update Service Client installation, to be able to run US related scripts to import packages to the correct server
There’s still one folder missing, that will be created by one of these parameters but some configurations will be missing and therefore it will error when creating new packages and importing them to the server:
C:\ProgramData\LS Retail\GoCurrent\Client
Fix the following:
Servers.json file
Fix the server address in the servers.json file. This is the original content:
{
  "Servers": [
    {
      "Guid": "0dc3c9b4-0ee0-412a-844c-11a373816e9d",
      "Name": "LS Retail's Update Service server",
      "Url": "https://updateservice.lsretail.com"
    }
    {
      "Guid": "b2ad2411-c5de-49db-b934-3a4cec559d70",
      "Name": "Update Service Server",
      "Url": "http://dazeu-test-us:8060"
    }
  ]
}
Instead of: "Url": "http://dazeu-test-us:8060" should be "Url": "http://dazeu-test-us-m:8060"
Migrating Update Service Server scripts folder
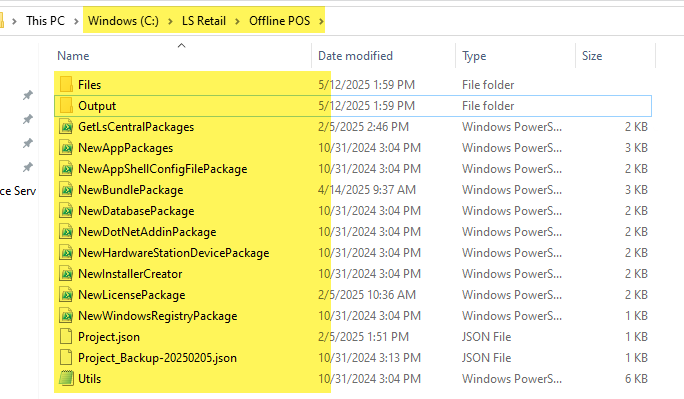
Zip and copy the files with the project scaffolding, from the source server to the destination server.
For example from C:\LS Retail\Offline POS
Configure VM firewall to allow inbound connections to Update Service Server management console (port 8060)

Migration Steps - In the POSes
Migrating the POSes to connect to the new server
Servers.json file (C:\ProgramData\LS Retail\GoCurrent\Client)
Fix the server address in the servers.json file.
{
  "Servers": [
    {
      "Guid": "b2ad2411-c5de-49db-b934-3a4cec559d70",
      "Name": "Update Service Server",
      "Url": "http://10.211.4.21:8060"
    },
    {
      "Guid": "0dc3c9b4-0ee0-412a-844c-11a373816e9d",
      "Name": "LS Retail's Update Service server",
      "Url": "https://updateservice.lsretail.com"
    }
  ]
}
Instead of: "Url": "http://10.211.4.21:8060" should be "Url": "http://10.211.4.13:8060"
Troubleshooting
Error 1
When trying to open the website, I always get the following error:
There was an error while performing this operation.

Details:
Filename: \\?\C:\inetpub\wwwroot\Update Service Server\web.config
Error:

---------------------------
OK
---------------------------
Most likely this is because some IIS modules/feature is missing in the destination website and that is (at least) the URL Rewrite Module.
To fix, download it from https://www.iis.net/downloads/microsoft/url-rewrite. Install it and restart IIS Manager.
If you are a LS Retail partner, I strongly advise you to get familiar with Update Service and use it in your implementations.
I hope you enjoyed this article and found it useful. Please share your comments.
Thanks and keep the good work!